Battery switch on travel trailer function is crucial for managing your RV’s power. Understanding how your battery switch works is key to preventing dead batteries and maximizing the lifespan of your trailer’s electrical system. This guide will walk you through the different types of switches, their functionalities, troubleshooting tips, installation, and maintenance, ensuring you’re ready to handle any power situation on the road.
We’ll cover everything from basic single-switch setups to more complex dual-battery systems, explaining the advantages and disadvantages of each. Learn how to diagnose problems, safely install a new switch, and perform regular maintenance to keep your trailer’s power running smoothly. We’ll even explore the impact of your battery switch on specific appliances and offer safety advice for working with your RV’s electrical system.
Battery Switch Types in Travel Trailers
Choosing the right battery switch for your travel trailer is crucial for managing your power sources effectively. Understanding the different types available will help you make an informed decision based on your needs and budget. This section will Artikel the common types, their pros and cons, and a comparison to aid in your selection.
Single Battery Switch
A single battery switch is the simplest type. It’s a single on/off switch that controls the power flow from your trailer’s battery to the 12-volt systems. This is suitable for trailers with only one battery. The advantage is its simplicity and low cost. However, it lacks the flexibility to manage multiple batteries or isolate them for maintenance.
If you only have one battery, this is a perfectly adequate and cost-effective option.
Dual Battery Switch
Dual battery switches allow you to control two separate batteries independently. This is beneficial for those with a house battery and a starting battery. You can switch between using either battery, both batteries, or neither. The advantages are increased power capacity and the ability to isolate batteries for maintenance or charging. However, they are slightly more complex to install than single switches and are more expensive.
A common use case is having one battery dedicated to running appliances and another for starting the tow vehicle.
Selector Battery Switch
A selector switch offers the most control and flexibility. These switches typically have multiple positions, allowing you to select which battery or combination of batteries is active, often including a “both” and “off” position. This provides superior control over your power resources, enabling you to prioritize power usage and easily isolate batteries for maintenance or charging. The advantages include superior control and the ability to use both batteries simultaneously.
However, they are the most complex to install and the most expensive. Think of it as having several different “modes” for power usage.
Battery Switch Comparison
| Feature | Single Switch | Dual Switch | Selector Switch |
|---|---|---|---|
| Number of Batteries Controlled | One | Two | Two or More |
| Control Options | On/Off | Battery 1, Battery 2, Both, Off | Various combinations depending on the switch, often including “Both” and “Off” |
| Cost | Low | Medium | High |
| Installation Complexity | Low | Medium | High |
Function and Purpose of the Battery Switch: Battery Switch On Travel Trailer Function
The battery switch in your travel trailer is a crucial component of its electrical system, acting as the central control for your house batteries. It’s essentially a safety and management device that allows you to selectively connect and disconnect your trailer’s house batteries from the rest of the electrical system. This control is essential for preventing unwanted battery drain and maximizing battery lifespan.The battery switch manages the power flow between your trailer’s house batteries and the various appliances and charging sources.
In the “on” position, it connects the house batteries to the trailer’s 12-volt system, powering lights, water pumps, and other devices. When the switch is in the “off” position, it completely isolates the house batteries, preventing any drain, even when the trailer is disconnected from shore power or a vehicle’s charging system. This is particularly important for long-term storage, preventing the batteries from completely discharging and potentially being damaged.
Battery Switch and Power Management
The battery switch’s primary function is to control the flow of electricity to and from the house batteries. This is achieved through a simple mechanical switch that either connects or disconnects the battery terminals. When connected, the batteries can supply power to the 12-volt system in the trailer. This power can come from the batteries themselves, or from a charging source connected to the trailer, like a shore power connection or the vehicle’s charging system (if equipped).
The switch ensures that this power flows appropriately and prevents accidental short circuits.
Battery Switch and Battery Life Extension
By isolating the house batteries when not in use, the battery switch significantly extends their lifespan. Even small, seemingly insignificant electrical drains can gradually deplete a battery over time, leading to premature failure. The switch prevents this “parasitic drain” from occurring, ensuring that the batteries remain fully charged when the trailer is not actively being used. This is especially beneficial during periods of storage, where leaving the batteries connected could lead to a completely discharged and potentially damaged battery.
So, you’re planning a trip? Awesome! Before you jet off, remember travel insurance is key. Check out Aon travel insurance for comprehensive coverage. They offer a range of plans, so you can find one that fits your budget and travel style. And if you need something more specific to your needs, then consider looking at Aon travel insurance – they might have specialized options for adventure travelers or those with pre-existing conditions.
Don’t leave home without it!
For example, a small LED light left on could drain a battery over several weeks, but the switch prevents this scenario.
Troubleshooting Common Battery Switch Issues
Your travel trailer’s battery switch is a crucial component, and problems with it can leave you stranded without power. Fortunately, many common issues are easily diagnosed and fixed with some basic troubleshooting. Understanding the symptoms and how to test the switch can save you time and frustration.Troubleshooting a faulty battery switch usually involves checking for power, inspecting the switch itself, and then using a multimeter for more precise diagnosis.
Remember to always disconnect the negative battery terminal before working on any electrical components in your RV.
No Power from the Battery Switch
If you’re getting no power at all from the battery switch, several things could be the culprit. The most common is a blown fuse within the switch itself (some switches have internal fuses), or a blown fuse in the main power distribution panel. Start by visually inspecting the fuse(s) – a blown fuse will typically show a broken filament.
So, you’re planning a trip? Awesome! Don’t forget travel insurance! Check out Aon travel insurance for comprehensive coverage. They’ve got options for everything from lost luggage to medical emergencies. And if you’re looking for a more detailed comparison of plans, you might want to also look at Aon travel insurance on this other site – they sometimes have different deals.
Getting insured is super important; peace of mind is priceless, right?
If a fuse is blown, replace it with one of the same amperage rating. If the new fuse blows immediately, there’s a short circuit somewhere in the wiring that needs to be addressed by a qualified electrician. If the fuses are fine, the problem may lie within the switch itself or in the wiring leading to the batteries.
Intermittent Power from the Battery Switch
Intermittent power usually points to a loose connection or a corroded terminal. Carefully inspect all connections at the battery switch, the batteries, and the main power panel. Tighten any loose connections and clean any corrosion with a wire brush and baking soda solution. After cleaning, apply a dielectric grease to prevent future corrosion. If the problem persists, the switch itself may be faulty and require replacement.
Overheating Battery Switch
A hot battery switch is a serious problem indicating excessive current draw or a short circuit. This situation demands immediate attention to prevent fire hazards. Immediately disconnect the negative battery terminal. Do not attempt to use the switch until the problem is identified and resolved. This usually requires a thorough inspection of the wiring for shorts or damaged insulation.
Again, a qualified RV technician or electrician should be consulted to diagnose and repair this issue. A multimeter can help identify high current draw, but it’s best left to a professional to handle in this situation.
Testing the Battery Switch with a Multimeter
Before testing, ensure the battery switch is turned OFF and the negative battery terminal is disconnected. You will need a multimeter set to measure DC voltage and continuity.First, check the voltage at the battery terminals. This should reflect the nominal voltage of your batteries (typically 12V). If the voltage is low or absent, the problem is with the batteries themselves, not the switch.Next, test the continuity of the switch.
Set the multimeter to the continuity setting (usually represented by a diode symbol). Place one probe on each terminal of the switch. If the switch is functioning correctly, the multimeter should beep indicating continuity when the switch is turned ON, and show no continuity when the switch is OFF. If there’s no continuity even with the switch ON, the switch is likely faulty.Finally, if the switch appears to be working based on the continuity test but you still have power issues, check the voltage at the output terminals of the switch when it’s ON.
If the voltage is significantly lower than the battery voltage, there could be a problem with the wiring or a high resistance connection somewhere in the circuit.
Battery Switch Installation and Wiring Diagrams
Installing a battery switch in your travel trailer is a relatively straightforward process that can significantly improve your RV’s electrical system management. This section details the wiring for a dual-battery setup and provides a step-by-step guide for installation. Remember, working with electricity requires caution; if you’re uncomfortable with this task, consult a qualified electrician.This section will cover a typical dual-battery setup, showing you how to wire a battery switch to control two batteries.
This allows you to isolate batteries, preventing discharge of one battery from affecting the other, and allows you to easily switch between battery banks for various needs. The diagram below illustrates the process, followed by a detailed installation guide.
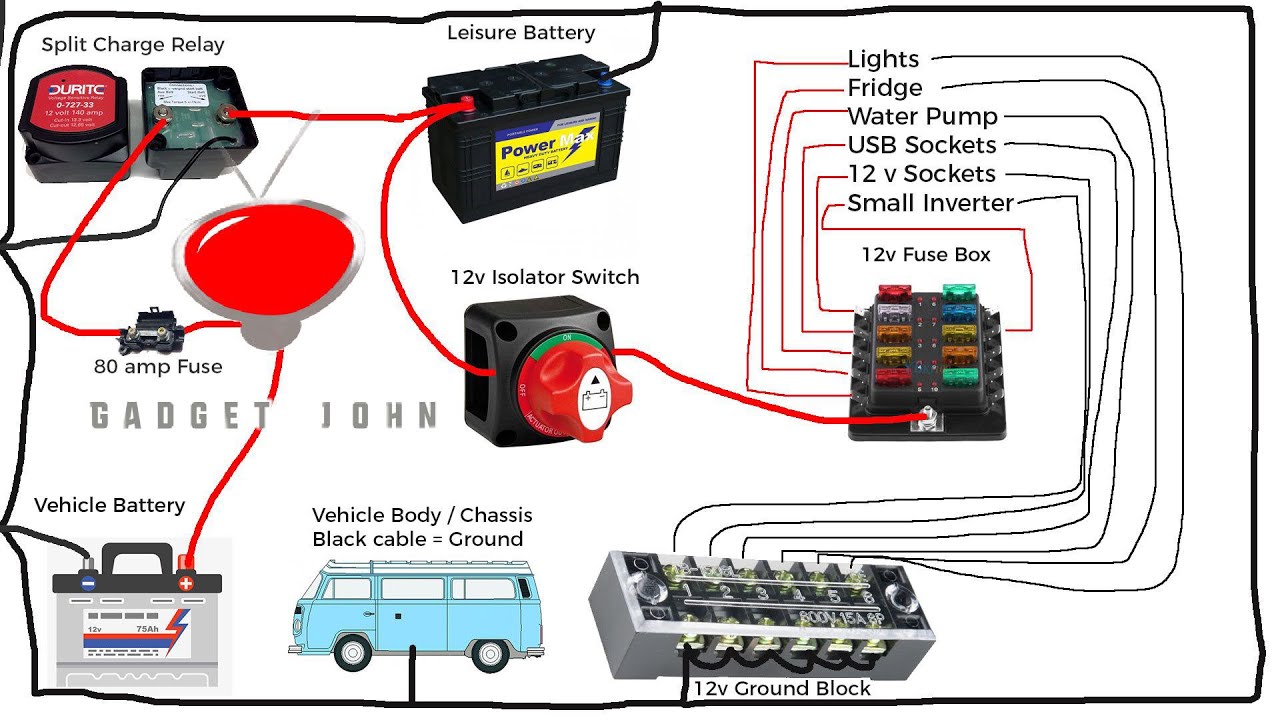
Dual Battery Switch Wiring Diagram
Imagine a simple diagram. At the top, you have your two batteries, labeled “Battery 1” and “Battery 2.” Each battery has a positive (+) and negative (-) terminal. From each positive terminal, a heavy-gauge wire runs to the input terminals of a dual battery switch. These wires should be appropriately sized for the amperage of your batteries and the expected load.
Similarly, a heavy-gauge wire connects the negative terminal of each battery to the negative bus bar or a common negative connection point. The dual battery switch has two output terminals, one for the house system and one for the starting system. A heavy-gauge wire runs from each output terminal of the switch to its respective system (house load and starting load).
Finally, the negative wire from the house system and starting system connect to the chassis ground. This creates a complete circuit, allowing you to switch power to either battery or both. Always ensure all connections are secure and properly insulated.
Step-by-Step Battery Switch Installation
Before you begin, disconnect the negative terminal from both batteries to prevent accidental shorts and shocks. This is crucial for your safety.
- Prepare the location: Choose a secure, dry, and easily accessible location for the battery switch. Ensure there’s enough space for the switch and for comfortable working conditions.
- Mount the switch: Securely mount the battery switch to a suitable surface using appropriate hardware. Make sure it’s firmly attached and won’t vibrate loose.
- Connect the positive wires: Connect the heavy-gauge positive wires from each battery to the corresponding input terminals on the battery switch. Use appropriately sized ring terminals for a secure connection and crimp them properly.
- Connect the negative wires: Connect the negative wires from each battery to a common negative bus bar or chassis ground. This creates a complete circuit for both batteries.
- Connect the output wires: Connect the heavy-gauge wires from the output terminals of the battery switch to the positive terminals of the house load and the starting load. Again, use appropriately sized ring terminals.
- Connect the ground wires: Connect the negative wires from your house and starting loads to the chassis ground.
- Test the connections: Before reconnecting the battery negative terminals, carefully inspect all connections to ensure they are secure and properly insulated. A multimeter can be used to check continuity and voltage.
- Reconnect the batteries: Reconnect the negative terminals to the batteries. Test the battery switch in each position to verify proper operation.
Necessary Tools and Materials
It’s important to gather all necessary tools and materials before starting the installation. This will ensure a smooth and efficient process.
- Dual battery switch (appropriately sized for your system)
- Heavy-gauge battery cables (appropriately sized for your system)
- Ring terminals (appropriately sized for your cables)
- Crimping tool
- Wire strippers/cutters
- Screwdriver (appropriate type for your switch mounting)
- Wrench (appropriate size for your battery terminals)
- Multimeter (for testing connections)
- Electrical tape or heat shrink tubing (for insulation)
- Safety glasses
- Gloves
Battery Switch and its Impact on Various Trailer Components
Your travel trailer’s battery switch is more than just an on/off button; it’s the central control for your trailer’s 12-volt DC system. Understanding how it affects different components is crucial for safe and efficient operation. A properly functioning switch ensures power flows correctly to your appliances and systems, while a faulty one can lead to malfunctions and even damage.
The battery switch acts as a gatekeeper, determining which circuits receive power from your trailer’s battery or batteries. Different switch positions offer varying levels of power distribution, affecting everything from your interior lights to your refrigerator. Improper use or a malfunctioning switch can result in unexpected power outages or even damage to sensitive electronic components.
Battery Switch Positions and Component Functionality
The impact of the battery switch position varies depending on the type of switch (single or dual) and its wiring configuration. However, a common configuration illustrates the general effects. The table below provides a simplified overview. Remember to consult your specific trailer’s wiring diagram for precise details.
| Switch Position | Interior Lights | Refrigerator (12V) | Water Pump |
|---|---|---|---|
| Off | Off | Off | Off |
| On (Battery Only) | On | On | On |
| On (Battery & Shore Power) | On (Shore power preferred) | On (Shore power preferred) | On |
Note: Some trailers may have additional switch positions or configurations. For example, some switches include a “battery charging” position, allowing charging from shore power while keeping the battery isolated from the trailer’s 12V system. Air conditioners typically operate on 120V AC power from shore power or a generator and are not directly controlled by the 12V battery switch.
Impact of a Faulty Battery Switch
A malfunctioning battery switch can cause a range of problems, significantly impacting your trailer’s electrical system. These problems can range from minor inconveniences to potentially dangerous situations.
For instance, a switch that doesn’t fully disconnect power can lead to parasitic drain on your battery, leaving you with a dead battery when you need it most. Conversely, a switch that fails to connect properly can leave you without power to essential components. In extreme cases, a faulty switch could create short circuits, potentially causing damage to your wiring, appliances, or even a fire.
Regular inspection and proper maintenance of your battery switch are vital to prevent these issues.
Safety Considerations when working with the Battery Switch

Working with a travel trailer’s battery switch involves dealing with potentially dangerous electrical currents. Ignoring safety precautions can lead to serious injury or damage to your trailer’s electrical system. Always prioritize safety when performing any tasks related to your trailer’s battery system.Proper safety procedures are essential to prevent accidents. These procedures minimize the risk of electric shock, burns, and other injuries associated with working near a 12-volt battery system.
Understanding potential hazards and knowing how to react in emergency situations is paramount.
Personal Protective Equipment (PPE)
Before working with your battery switch, it’s crucial to wear appropriate personal protective equipment (PPE). This protects you from potential hazards like electrical shock, battery acid splashes, and other injuries.
- Safety Glasses: Protect your eyes from splashes of battery acid or sparks.
- Gloves: Insulated gloves prevent electric shock and protect your hands from battery acid.
- Closed-toe Shoes: Protect your feet from dropped tools or accidental spills.
Hazards of Incorrect Battery Switch Operation
Improper operation of the battery switch can lead to several hazards. Connecting or disconnecting the battery improperly can cause sparks, potentially igniting flammable materials nearby. Incorrect switching can also damage your trailer’s electrical components or lead to a complete power failure. Furthermore, accidental short circuits can result in significant damage and fire.
Emergency Procedures, Battery switch on travel trailer function
Knowing what to do in an emergency is vital. In the event of an electrical shock, immediately disconnect the battery switch to cut off the power source. If someone is experiencing an electrical shock, donot* touch them directly. Instead, use a non-conductive material, like a wooden stick or broom handle, to move the person away from the source of the shock.
Call emergency services immediately.In the event of a fire, evacuate the area immediately and call the fire department. Attempting to extinguish a battery fire with water can be extremely dangerous and could worsen the situation due to the potential for an explosion. Use a fire extinguisher rated for electrical fires (Class C) if you are trained and comfortable doing so.
Never attempt to fight a large or rapidly spreading fire yourself.
Mastering your travel trailer’s battery switch is about more than just flipping a lever; it’s about understanding your RV’s power system and ensuring reliable operation. By understanding the different types of switches, troubleshooting common issues, and implementing preventative maintenance, you can extend the life of your batteries and enjoy worry-free adventures. Remember to always prioritize safety when working with electricity.
Happy travels!
Questions and Answers
What happens if my battery switch is faulty?
A faulty switch can lead to dead batteries, intermittent power, or even damage to your trailer’s electrical components. You might experience flickering lights, malfunctioning appliances, or complete power loss.
How often should I inspect my battery switch?
Regularly inspect your battery switch at least once a season, checking for corrosion, loose connections, and any signs of damage. More frequent checks are recommended if you notice any electrical problems.
Can I install a battery switch myself?
While possible, installing a battery switch requires basic electrical knowledge and familiarity with your RV’s wiring. If unsure, consult a qualified RV technician.
How do I clean corroded battery switch terminals?
Use a wire brush and baking soda solution to clean corroded terminals. Disconnect the battery before cleaning and wear appropriate safety gear.
